Harbor高可用集群设计及部署
一、环境说明
1.1 架构图
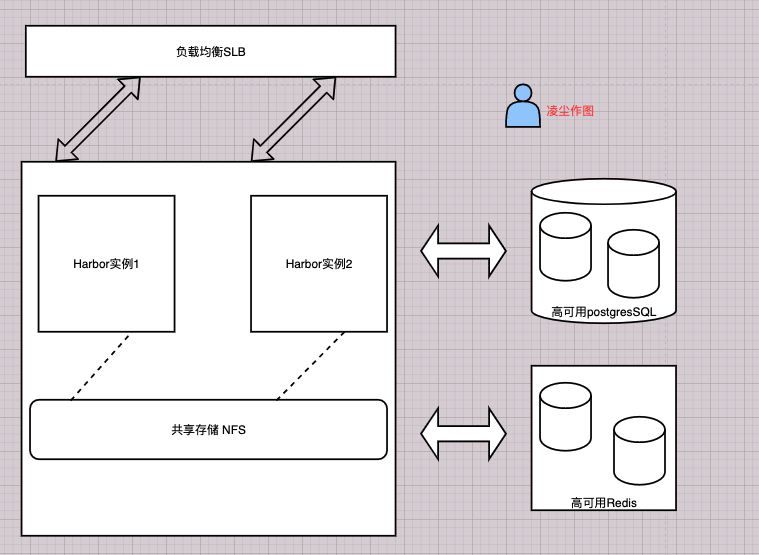
架构解析:将Harbor的redis缓存组件、PostgreSQL数据库组件迁移到系统外部做高可用,使用外部共享存储实现多个Harbor实例的数据共享,Harbor实例可横向扩展。
1.2 主机详情
| IP地址 | 主机名 | 备注 |
|---|---|---|
| 172.16.215.135 | Harbor1 | harbor实例1,8021端口 |
| 172.16.215.136 | Harbor2 | harbor实例2,8021端口 |
| 172.16.215.137 | Harbor-store | harbor实例共享存储、外部数据库、缓存服务 |
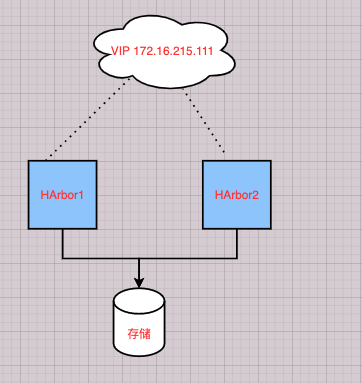
| 172.16.215.111 | / | VIP,8121端口 |
1.3 服务版本
| 服务 | 版本要求 | 安装版本 |
|---|---|---|
| HArbor | / | 2.3.5 |
| Docker | 17.06.0+ | 20.10.17 |
| Docker-compose | 1.18.0+ | 1.24.1 |
| Redis | 6.0.16 | 6.2.7 |
| PostgreSQL | v13.2 | v13.5 |
二、初始化服务器
2.1 安装Docker
$ wget -O /etc/yum.repos.d/docker-ce.repo https://mirrors.aliyun.com/docker-ce/linux/centos/docker-ce.repo
$ yum install -y docker-ce
$ systemctl start docker && systemctl enable docker && systemctl status docker
$ cat <<EOF > /etc/docker/daemon.json
{
   "registry-mirrors": ["https://xcg41ct3.mirror.aliyuncs.com"],
   "exec-opts": ["native.cgroupdriver=systemd"],
   "registry-mirrors": ["https://3hjcmqfe.mirror.aliyuncs.com"],
   "insecure-registries": ["172.16.215.111:8121"], # 解决后面上传镜像不使用ssl报错
   "log-driver": "json-file",
   "log-opts": {
           "max-size": "500m",
           "max-file": "2"
        }
}
EOF
$ systemctl daemon-reload
$ systemctl restart docker
"insecure-registries": ["172.16.215.111:8121"] # 解决后面上传镜像不使用ssl报错
"registry-mirrors": ["https://3hjcmqfe.mirror.aliyuncs.com"] # 镜像加速地址
2.2 安装docker-compose
安装docker-compose 1.18.0版本以上,此处可看情况自行选择即可,我选择1.24.1版本
$ wget https://github.com/docker/compose/releases/download/v2.2.3/docker-compose-linux-x86_64
$ mv  docker-compose-linux-x86_64 /usr/local/bin/docker-compose
$ chmod +x /usr/local/bin/docker-compose
$ docker-compose version
Docker Compose version v2.2.3
2.3 优化系统内核参数
$ cat >> /etc/sysctl.conf << EOF
net.bridge.bridge-nf-call-ip6tables = 1
net.bridge.bridge-nf-call-iptables = 1
net.ipv4.ip_forward = 1
EOF
$ sysctl -p
三、使用NFS服务提供外部共享存储
本人选择137这台主机部署NFS Server给135、136 Harbor实例提供外部共享存储服务
3.1 部署NFS服务端
(1)安装服务
$ yum  install -y  nfs-utils rpcbind
$ systemctl start nfs && systemctl enable nfs  && systemctl status nfs
$ systemctl start rpcbind && systemctl enable rpcbind && systemctl status rpcbind
(2)创建共享目录
$ mkdir -p /data/harbor_data(3)修改配置
$ cat /etc/exports
/data/harbor_data 172.16.215.0/24(rw,async,no_root_squash)
$ exportfs -arv            #使配置文件生效

$ systemctl restart nfs
(4)检查共享目录信息
$ showmount -e localhost 3.2 部署客户端
在两台Harbor实例上操作
$ yum -y install nfs-utils rpcbind
$ systemctl start nfs-utils &&  systemctl enable nfs-utils && systemctl status  nfs-utils
$ systemctl start rpcbind && systemctl enable rpcbind && systemctl status rpcbind
3.3 客户端检查server共享目录 & 挂载
$ showmount -e 172.16.215.137
Export list for 172.16.215.137:
/data/harbor_data 172.16.215.0/24

$ mkdir -p /data/harbor_data
$ cat <<EOF >> /etc/fstab
172.16.215.137:/data/harbor_data /data/harbor_data nfs  defaults  0 0
EOF
$ mount -a

[root@harbor2 ~]# echo 1 >  /data/harbor_data/new.txt
[root@harbor1 ~]# ls /data/harbor_data/
new.txt
$ showmount -e 172.16.215.137
clnt_create: RPC: Port mapper failure - Unable to receive: errno 113 (No route to host)遇到这个报错,可以检查一下防火墙、SELinux等权限是否关闭或开放
四、部署Redis服务
Store 137 服务器上部署redis
部署服务可以源码安装,也可以yum 安装,看个人喜好
4.1 安装服务
$ wget -O /etc/yum.repos.d/epel.repo http://mirrors.aliyun.com/repo/epel-7.repo
$ yum -y install redis
4.2 修改配置
$ vim /etc/redis.conf
#bind 127.0.0.1   #注释掉bind的行,允许任何主机连接;
daemonize yes     #将no修改为yes,使redis可以使用守护进程方式启动(源码安装情况下,打开可以使用systemctl 管理);
requirepass lingchen   #设置redis连接的登录密码 (注意如果带#号,后续harbor连接会出错,需要加转译,简单起见,建议不使用特殊字符)
4.3 启动服务
$ systemctl start redis && systemctl enable redis && systemctl status redis4.4 验证服务
1. 检查端口
$ ss -ntulp | grep 6379
tcp    LISTEN     0      128       *:6379                  *:*                   users:(("redis-server",pid=21133,fd=5))
tcp    LISTEN     0      128    [::]:6379               [::]:*                   users:(("redis-server",pid=21133,fd=4))

2. 测试客户端连接redis
#查看redis-cli工具位置,拷贝给客户端
$ which redis-cli
/usr/local/bin/redis-cli
$ scp /usr/local/bin/redis-cli  172.16.215.135:/usr/local/bin/
$ scp /usr/local/bin/redis-cli  172.16.215.136:/usr/local/bin/

[root@harbor-2 harbor]# redis-cli -h 172.16.215.137 -a lingchen
Warning: Using a password with '-a' or '-u' option on the command line interface may not be safe.
172.16.215.137:6379> ping
PONG
五、部署PostgreSQL服务
同样数据存储都部署在Harbor store 137 服务器,给harbor实例提供共享存储
5.1 新建postgres用户
默认超级用户(root)不能启动postgresql,需要手动建用户postgres
$ useradd postgres
$ id postgres
uid=1000(postgres) gid=1000(postgres) 组=1000(postgres)
5.2 安装依赖包
$ yum -y install readline-devel zlib-devel gcc zlib5.3 下载源码并解压
$ wget https://ftp.postgresql.org/pub/source/v13.5/postgresql-13.5.tar.gz --no-check-certificate
$ tar zxvf postgresql-13.5.tar.gz   -C  /app/
5.4 编译安装
$ cd /app/postgresql-13.5/
$ ./configure  --prefix=/usr/local/postgresql
$ make && make install
5.5 创建数据目录
$ mkdir -p /data/postgresql/data
$ chown -R postgres:postgres /usr/local/postgresql/
$ chown -R postgres:postgres /data/postgresql/data/
5.6 设置环境变量
[root@harbor-store postgresql-13.5]# su  - postgres
[postgres@harbor-store ~]$ vim  .bash_profile
PGHOME=/usr/local/postgresql   #psql安装目录
export PGHOME
PGDATA=/data/postgresql/data    #数据库目录
export PGDATA
PATH=$PATH:$HOME/bin:$HOME/.local/bin:$PGHOME/bin
export PATH
[postgres@harbor-store ~]$ source ./.bash_profile
[postgres@harbor-store ~]$ which psql
/usr/local/postgresql/bin/psql
[postgres@harbor-store ~]$ psql -V
psql (PostgreSQL) 13.5
5.7 初始化数据库
[postgres@harbor-store ~]$ initdb
......
You can change this by editing pg_hba.conf or using the option -A, or
--auth-local and --auth-host, the next time you run initdb.
Success. You can now start the database server using:
    pg_ctl -D /data/postgresql/data -l logfile start
    #表示初始化成功
5.8 启动PostgreSQL
[postgres@harbor-store ~]$ pg_ctl -D /data/postgresql/data -l logfile start
waiting for server to start.... done
server started
5.9 设置PostgreSQL密码
PostgreSQL默认本地登录不需要密码,因为配置文件中pg_hba.conf中的local设置为trust. 为了安全设置密码
假设忘记了登录密码,可通过设置trust值来进行登录后修改密码操作
[postgres@harbor-store ~]$ psql
psql (13.5)
Type "help" for help.

postgres=# \password
Enter new password:     #输入设置的密码
Enter it again:      #确认密码(再次输入)
postgres=# \q    #退出
5.10 设置可远程登录PostgreSQL
[postgres@harbor-store ~]$ vim /data/postgresql/data/postgresql.conf
listen_addresses = '*'    #监听所有地址
[postgres@harbor-store ~]$  tail -10 /data/postgresql/data/pg_hba.conf
local   all             all                                     password
# IPv4 local connections:
host    all             all             0.0.0.0/0               password
# IPv6 local connections:
host    all             all             ::1/128                 password
# Allow replication connections from localhost, by a user with the
# replication privilege.
local   replication     all                                     trust
host    replication     all             127.0.0.1/32            trust
host    replication     all             ::1/128                 trust
5.11 重启PostgreSQL
$ pg_ctl -D /data/postgresql/data -l /data/postgresql/data/postgres.log restart

waiting for server to shut down.... done
server stopped
waiting for server to start.... done
server started
5.12 创建数据库
目前Harbor仅支持PostgraSQL数据库,需要手动在外部的PostgreSQL上创建registry、notary_signer、notary_servers三个数据库,Harbor启动时会自动在对应数据库下生成表。 建议创建普通账号对这三张表进行授权使用
[postgres@harbor-store ~]$ psql
Password for user postgres:     #输入密码

postgres=# create database  registry;
CREATE DATABASE
postgres=# create database notary_signer;
CREATE DATABASE
postgres=# create database notary_servers;
CREATE DATABASE
postgres=# \l
                                    List of databases
      Name      |  Owner   | Encoding |   Collate   |    Ctype    |   Access privileges
----------------+----------+----------+-------------+-------------+-----------------------
 notary_servers | postgres | UTF8     | en_US.UTF-8 | en_US.UTF-8 |
 notary_signer  | postgres | UTF8     | en_US.UTF-8 | en_US.UTF-8 |
 postgres       | postgres | UTF8     | en_US.UTF-8 | en_US.UTF-8 |
 registry       | postgres | UTF8     | en_US.UTF-8 | en_US.UTF-8 |
 template0      | postgres | UTF8     | en_US.UTF-8 | en_US.UTF-8 | =c/postgres          +
                |          |          |             |             | postgres=CTc/postgres
 template1      | postgres | UTF8     | en_US.UTF-8 | en_US.UTF-8 | =c/postgres          +
                |          |          |             |             | postgres=CTc/postgres
(6 rows)
5.13 创建用户
postgres=# create user lingchen with password 'AFE#qr33';
CREATE ROLE

postgres=# \du
                                   List of roles
 Role name |                         Attributes                         | Member of
-----------+------------------------------------------------------------+-----------
 postgres  | Superuser, Create role, Create DB, Replication, Bypass RLS | {}
 lingchen  |                                                            | {}
六、负载均衡配置(Nginx + Keepalived)
使用keepalived和Nginx实现harbor的高可用。在harbor1和harbor2节点上安装keepalived服务来提供VIP实现负载均衡。Nginx服务则实现将来到VIP的请求转发到后端服务器组harbor
6.1 安装nginx和keepalived
# 在harbor两台实例操作
$ wget -O /etc/yum.repos.d/epel.repo http://mirrors.aliyun.com/repo/epel-7.repo
$ yum install -y nginx keepalived
$ yum -y install nginx-all-modules.noarch
6.2 修改nginx配置
$ vim /etc/nginx/nginx.conf
user nginx;
worker_processes auto;   #自动设置nginx的工作进程数量
error_log /var/log/nginx/error.log;
pid /run/nginx.pid;
include /usr/share/nginx/modules/*.conf;

events {
    worker_connections 1024;   #工作进程的连接数
}

# 四层负载均衡,为两台harbor提供负载均衡
stream {
    log_format  main  '$remote_addr $upstream_addr - [$time_local] $status $upstream_bytes_sent';
    access_log  /var/log/nginx/harbor-access.log  main;

    upstream harbor{
       server 172.16.215.135:8021;   # harbor1
       server 172.16.215.136:8021;   # harbor2
    }
    server {
       listen  8121;  #由于nginx与harbor节点复用,这个监听端口不能是8021,否则会冲突
       proxy_pass harbor;
    }
}

http {
    log_format  main  '$remote_addr - $remote_user [$time_local] "$request" '
                      '$status $body_bytes_sent "$http_referer" '
                      '"$http_user_agent" "$http_x_forwarded_for"';
    access_log  /var/log/nginx/access.log  main;
    sendfile            on;
    tcp_nopush          on;
    tcp_nodelay         on;
    keepalive_timeout   65;
    types_hash_max_size 2048;
    include             /etc/nginx/mime.types;
    default_type        application/octet-stream;
    server {
        listen       80 default_server;
        server_name  _;
        location / {
        }
    }
}

$ nginx -t
nginx: the configuration file /etc/nginx/nginx.conf syntax is ok
nginx: configuration file /etc/nginx/nginx.conf test is successful
6.3 修改keepalived 配置
(1)harbor1 主节点
cat /etc/keepalived/keepalived.conf
! Configuration File for keepalived

global_defs {
   notification_email {
     lingchen@163.com
   }
  # notification_email_from Alexandre.Cassen@firewall.loc
  # smtp_server 192.168.200.1
  # smtp_connect_timeout 30
   router_id master1
   vrrp_skip_check_adv_addr
   vrrp_strict
   vrrp_garp_interval 0
   vrrp_gna_interval 0
}

vrrp_instance yf {
    state MASTER
    interface ens33
    virtual_router_id 51
    priority 100 # 权重 备节点比100小就行(80)
    advert_int 1
    authentication {
        auth_type PASS
        auth_pass 1111
    }
    virtual_ipaddress {
        172.16.215.111/24 # 虚拟IP
    }
    track_script {
    chk_nginx
    }
}
vrrp_script chk_nginx {
  script "/etc/keepalived/check_nginx.sh"
  interval 2
  weight -20
}
6.4 健康检查脚本
$ vim /etc/keepalived/check_nginx.sh
#!/bin/bash
#1、判断Nginx是否存活
counter=`ps -C nginx --no-header | wc -l`
if [ $counter -eq 0 ]; then
    #2、如果不存活则尝试启动Nginx
    service nginx start
    sleep 2
    #3、等待2秒后再次获取一次Nginx状态
    counter=`ps -C nginx --no-header | wc -l`
    #4、再次进行判断,如Nginx还不存活则停止Keepalived,让地址进行漂移
    if [ $counter -eq 0 ]; then
        service  keepalived stop
    fi
fi
$ chmod +x /etc/keepalived/check_nginx.sh
6.5 启动服务
$ systemctl start nginx && systemctl enable nginx && systemctl status nginx
$ systemctl start keepalived && systemctl enable keepalived && systemctl status keepalived
6.6 查看VIP是否绑定
$ ip addr
2: ens33: <BROADCAST,MULTICAST,UP,LOWER_UP> mtu 1500 qdisc pfifo_fast state UP group default qlen 1000
    link/ether 00:0c:29:32:16:b9 brd ff:ff:ff:ff:ff:ff
    inet 172.16.215.136/24 brd 172.16.215.255 scope global noprefixroute dynamic ens33
       valid_lft 1518sec preferred_lft 1518sec
    inet 172.16.215.111/24 scope global secondary ens33
       valid_lft forever preferred_lft forever
    inet6 fe80::8c0b:c924:e5ae:3271/64 scope link noprefixroute
       valid_lft forever preferred_lft forever
七、部署Harbor 实例
7.1 下载解压离线安装包
$ mkdir /app   #创建安装目录
$ wget https://github.com/goharbor/harbor/releases/download/v2.3.5/harbor-offline-installer-v2.3.5.tgz
$ tar zxvf harbor-offline-installer-v2.3.5.tgz  -C  /app/
7.2 修改配置文件
$ cd /app/harbor
$ cp harbor.yml.tmpl  harbor.yml
$ sed '/^#.*\|^$\|#.*/d' harbor.yml
hostname: 172.16.215.136
http:
  port: 8021

#取消https安全加密访问方式:
#https:
#  port: 443
#  certificate: /your/certificate/path
#  private_key: /your/private/key/path

external_url: http://172.16.215.111:8121
harbor_admin_password: Harbor12345
data_volume: /data/harbor_data
trivy:
  ignore_unfixed: false
  skip_update: false
  insecure: false
jobservice:
  max_job_workers: 10
notification:
  webhook_job_max_retry: 10
chart:
  absolute_url: disabled
log:
  level: info
  local:
    rotate_count: 50
    rotate_size: 200M
    location: /var/log/harbor
_version: 2.3.0
external_database:
  harbor:
    host: 172.16.215.137
    port: 5432
    db_name: registry
    username: postgres
    ssl_mode: disable
    max_idle_conns: 2
    max_open_conns: 0
  notary_signer:
    host: 172.16.215.137
    port: 5432
    db_name: notary_signer
    username: postgres
    ssl_mode: disable
  notary_server:
    host: 172.16.215.137
    port: 55432
    db_name: notary_server
    username: postgres
    ssl_mode: disable
external_redis:
   host: 172.16.215.137:6379
   password: lingchen
   registry_db_index: 1
   jobservice_db_index: 2
   chartmuseum_db_index: 3
   trivy_db_index: 5
   idle_timeout_seconds: 30
proxy:
  http_proxy:
  https_proxy:
  no_proxy:
  components:
    - core
    - jobservice
    - trivy
metric:
   enabled: true
   port: 9090
   path: /metrics
7.3 将配置文件注入到组件中 & 安装
$  ./prepare

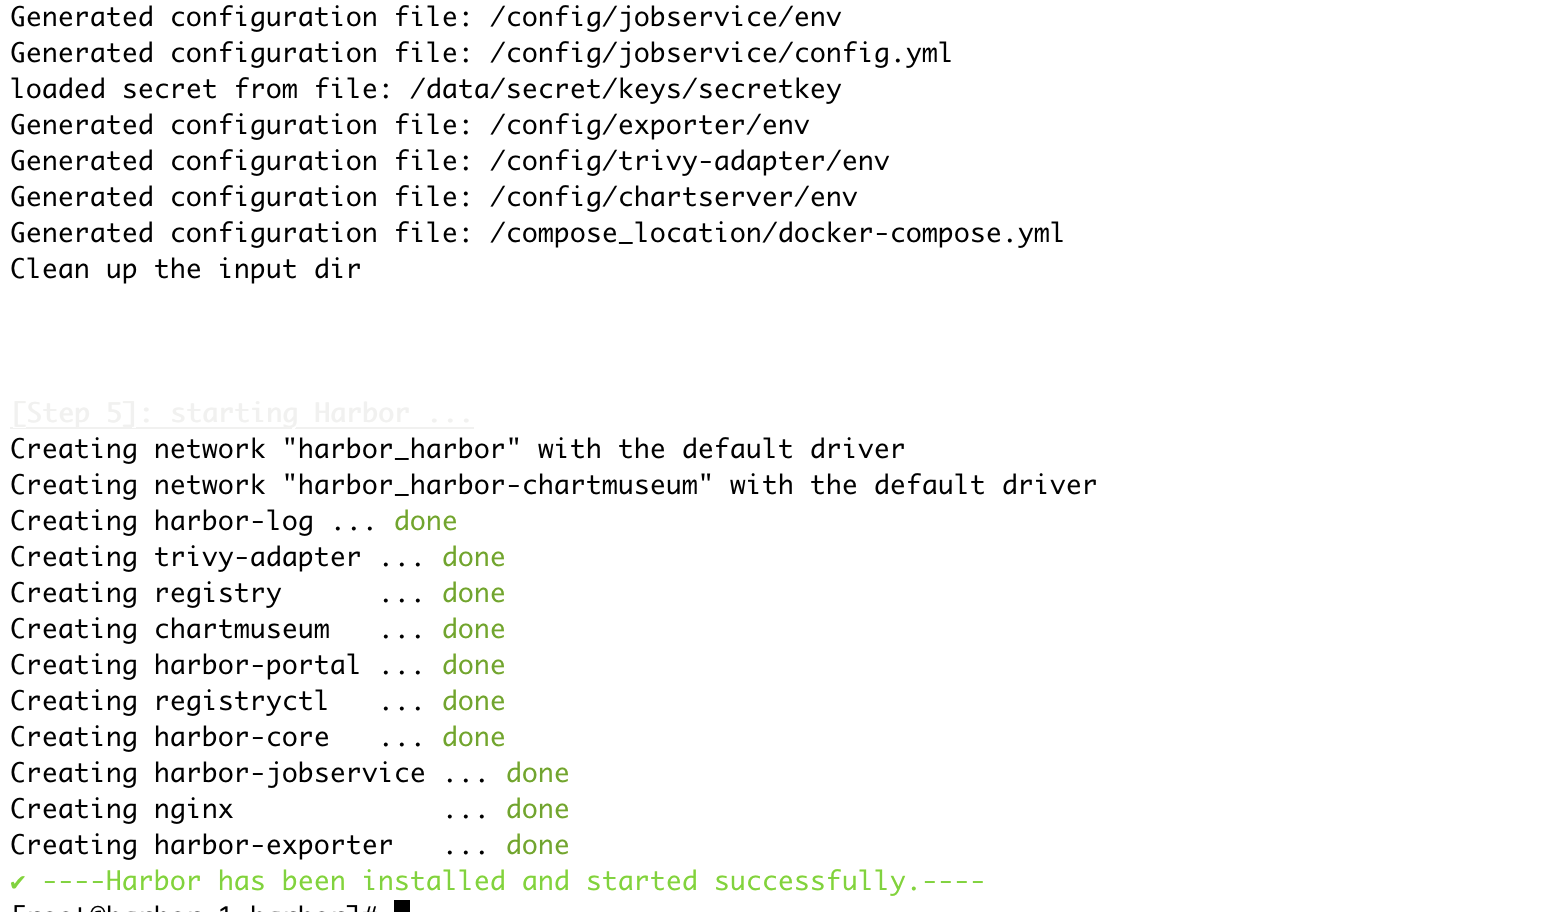
$ ./install.sh --with-trivy --with-chartmuseum 
7.4 查看状态
[root@harbor-1 harbor]# docker-compose  ps
      Name                     Command                  State                                             Ports
-------------------------------------------------------------------------------------------------------------
chartmuseum         ./docker-entrypoint.sh           Up (healthy)
harbor-core         /harbor/entrypoint.sh            Up (healthy)
harbor-exporter     /harbor/entrypoint.sh            Up
harbor-jobservice   /harbor/entrypoint.sh            Up (healthy)
harbor-log          /bin/sh -c /usr/local/bin/ ...   Up (healthy)   127.0.0.1:1514->10514/tcp
harbor-portal       nginx -g daemon off;             Up (healthy)
nginx               nginx -g daemon off;             Up (healthy)   0.0.0.0:8021->8080/tcp,:::8021->8080/tcp, 0.0.0.0:9090->9090/tcp,:::9090->9090/tcp
registry            /home/harbor/entrypoint.sh       Up (healthy)
registryctl         /home/harbor/start.sh            Up (healthy)
trivy-adapter       /home/scanner/entrypoint.sh      Up (healthy)
7.5 浏览器登录Harbor
用户名:admin
密码:Harbor12345

八、部署实例harbor2
将harbor1的安装包和配置文件拷贝到harbor2,一模一样的再来一次
$ vim /app/harbor/harbor.yml’
hostname: 192.168.2.108
九、服务验证
9.1 浏览器访问VIP地址
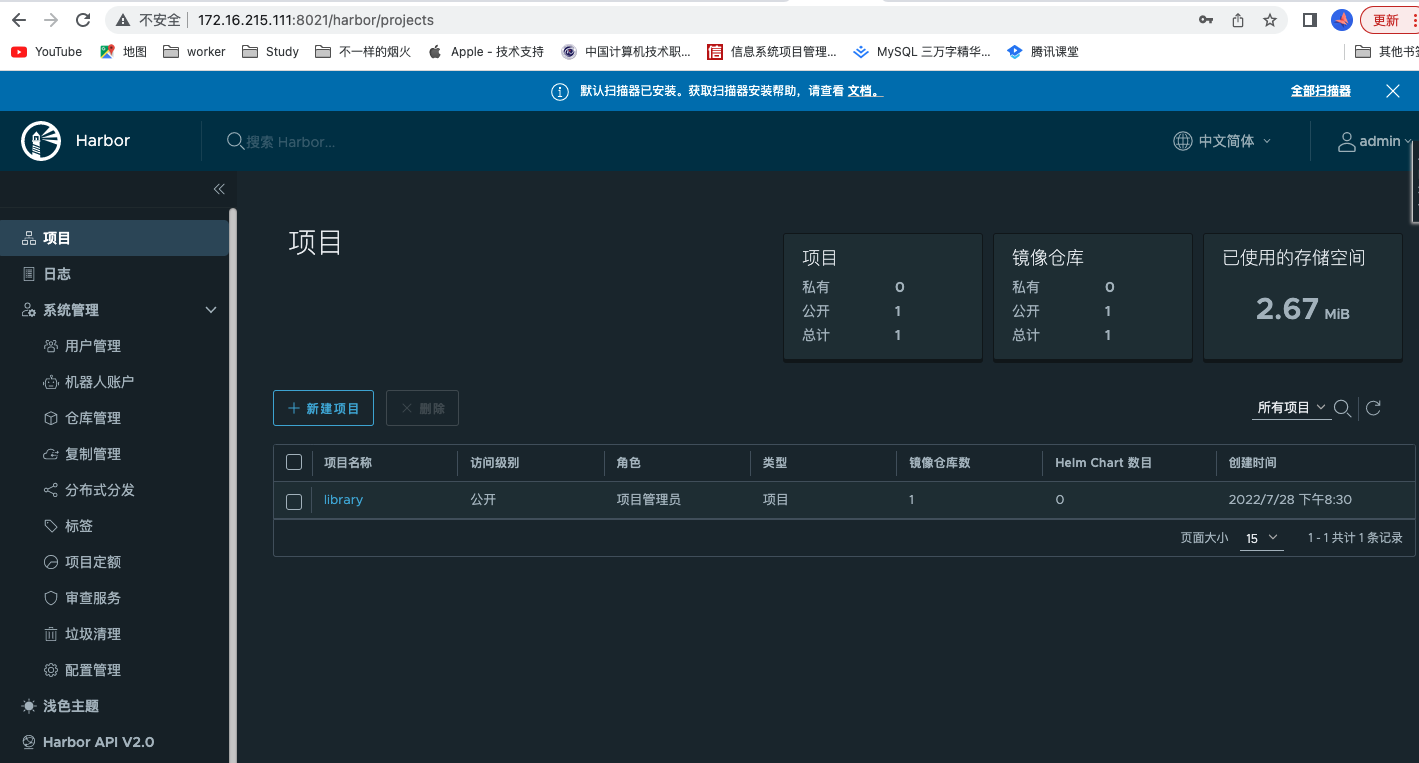
9.2 命令行登录Harbor
[root@harbor-1 harbor]# docker login http://172.16.215.111:8121 -u admin -p Harbor12345
WARNING! Using --password via the CLI is insecure. Use --password-stdin.
WARNING! Your password will be stored unencrypted in /root/.docker/config.json.
Configure a credential helper to remove this warning. See
https://docs.docker.com/engine/reference/commandline/login/#credentials-store

Login Succeeded
9.3 向harbor推送镜像
[root@harbor1 harbor]# docker pull nginx:latest
[root@harbor1 harbor]# docker tag nginx:latest 192.168.2.111:8121/library/nginx:latest
[root@harbor1 harbor]# docker  push 192.168.2.111:8121/library/nginx:latest
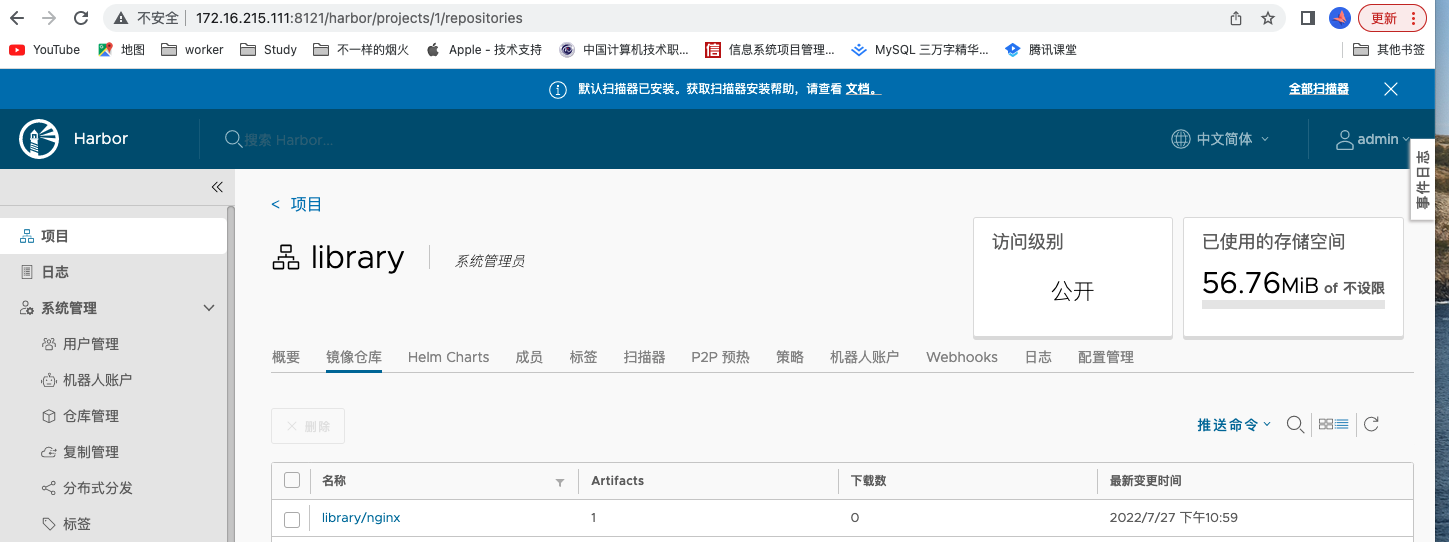
9.4 在页面中查看
